Part 1: Getting Started with MAP

TransPort WR44 R Configuration

Before you can begin the process of configuring your TransPort WR44 R device for use with MAP you must identify the accessories included in your box, connect this hardware to your device, and install a SIM card into your device.

Note: If you have already completed these steps, proceed with the Mobile Configuration section.

Identify Kit Contents

Depending on which WR44 R variant you're using, your kit should contain the following:
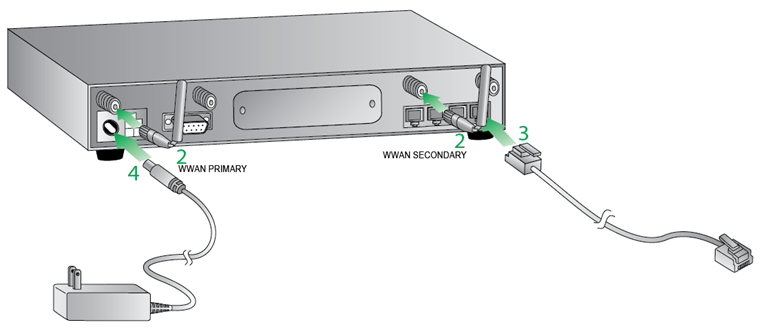
  • 1 TransPort WR44 R unit
  • 1 Ethernet cable
  • 2 Cellular antennas
  • 1 Power supply
  • 1 Fleet power cord

Connect Hardware

  1. Install the SIM card(s): A SIM card must be supplied and activated by a cellular service provider for device operation. SIM card(s) should be inserted into the SIM sockets as illustrated below. For SIM 1, the contacts should be face down. For SIM 2 (if applicable), the contacts should be face up. In both cases, the end of the SIM card with the chamfered corner should be inserted first.
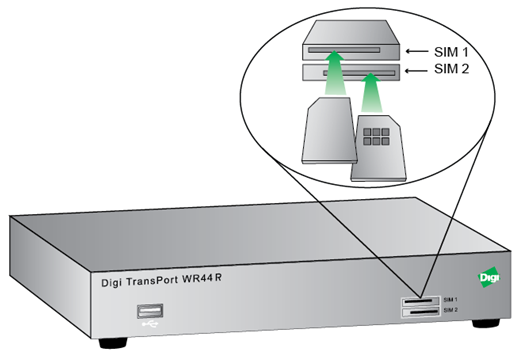
  2. Note: The TransPort WR44 R allows for dual network installations where one wireless service can be used as a back-up in the event that the primary service fails. These installations cannot be used to access two networks simultaneously. By default, SIM 1 is used for access to the primary network and SIM 2 is used for the back-up network.

    WR44 Install SIM

  3. Connect the Cellular (WWAN) Antenna(s): Connect one cellular antenna to the “WWAN PRIMARY” connector on the device. If the device is equipped with a secondary cellular antenna, connect this antenna to the "WWAN SECONDARY" connector on the device. Dual antennas will provide improved signal strength thus better performance.

  4. Connect the Ethernet Cable: Connect one end of the Ethernet cable to the “LAN” port on the unit and the other end to a LAN port on a PC.

  5. Connect the Power Supply: Connect the locking barrel end of the power supply to the “MAIN” connector on the unit, and plug the other end into a wall outlet.
  6. WR44 Connect Hardware

When the unit is powered-up, the POWER indicator will illuminate and the unit will initiate a series of diagnostic self-tests. During this process one or more of the other indicators will flash to show that the unit is busy. When the flashing stops, the unit has completed its self-test diagnostics and is ready to be configured.

Once you have completed the steps described above, you're ready to begin configuring your device for use with MAP.

Back to Step 2 | Move to Mobile Configuration


Small Digi Logo Copyright ©2013 Digi International Inc. All rights reserved.
90001325_A